
Download – Software Beam Studio ที่นี่ <—
Download – คู่มือ Flux Beamo ที่นี่ <—
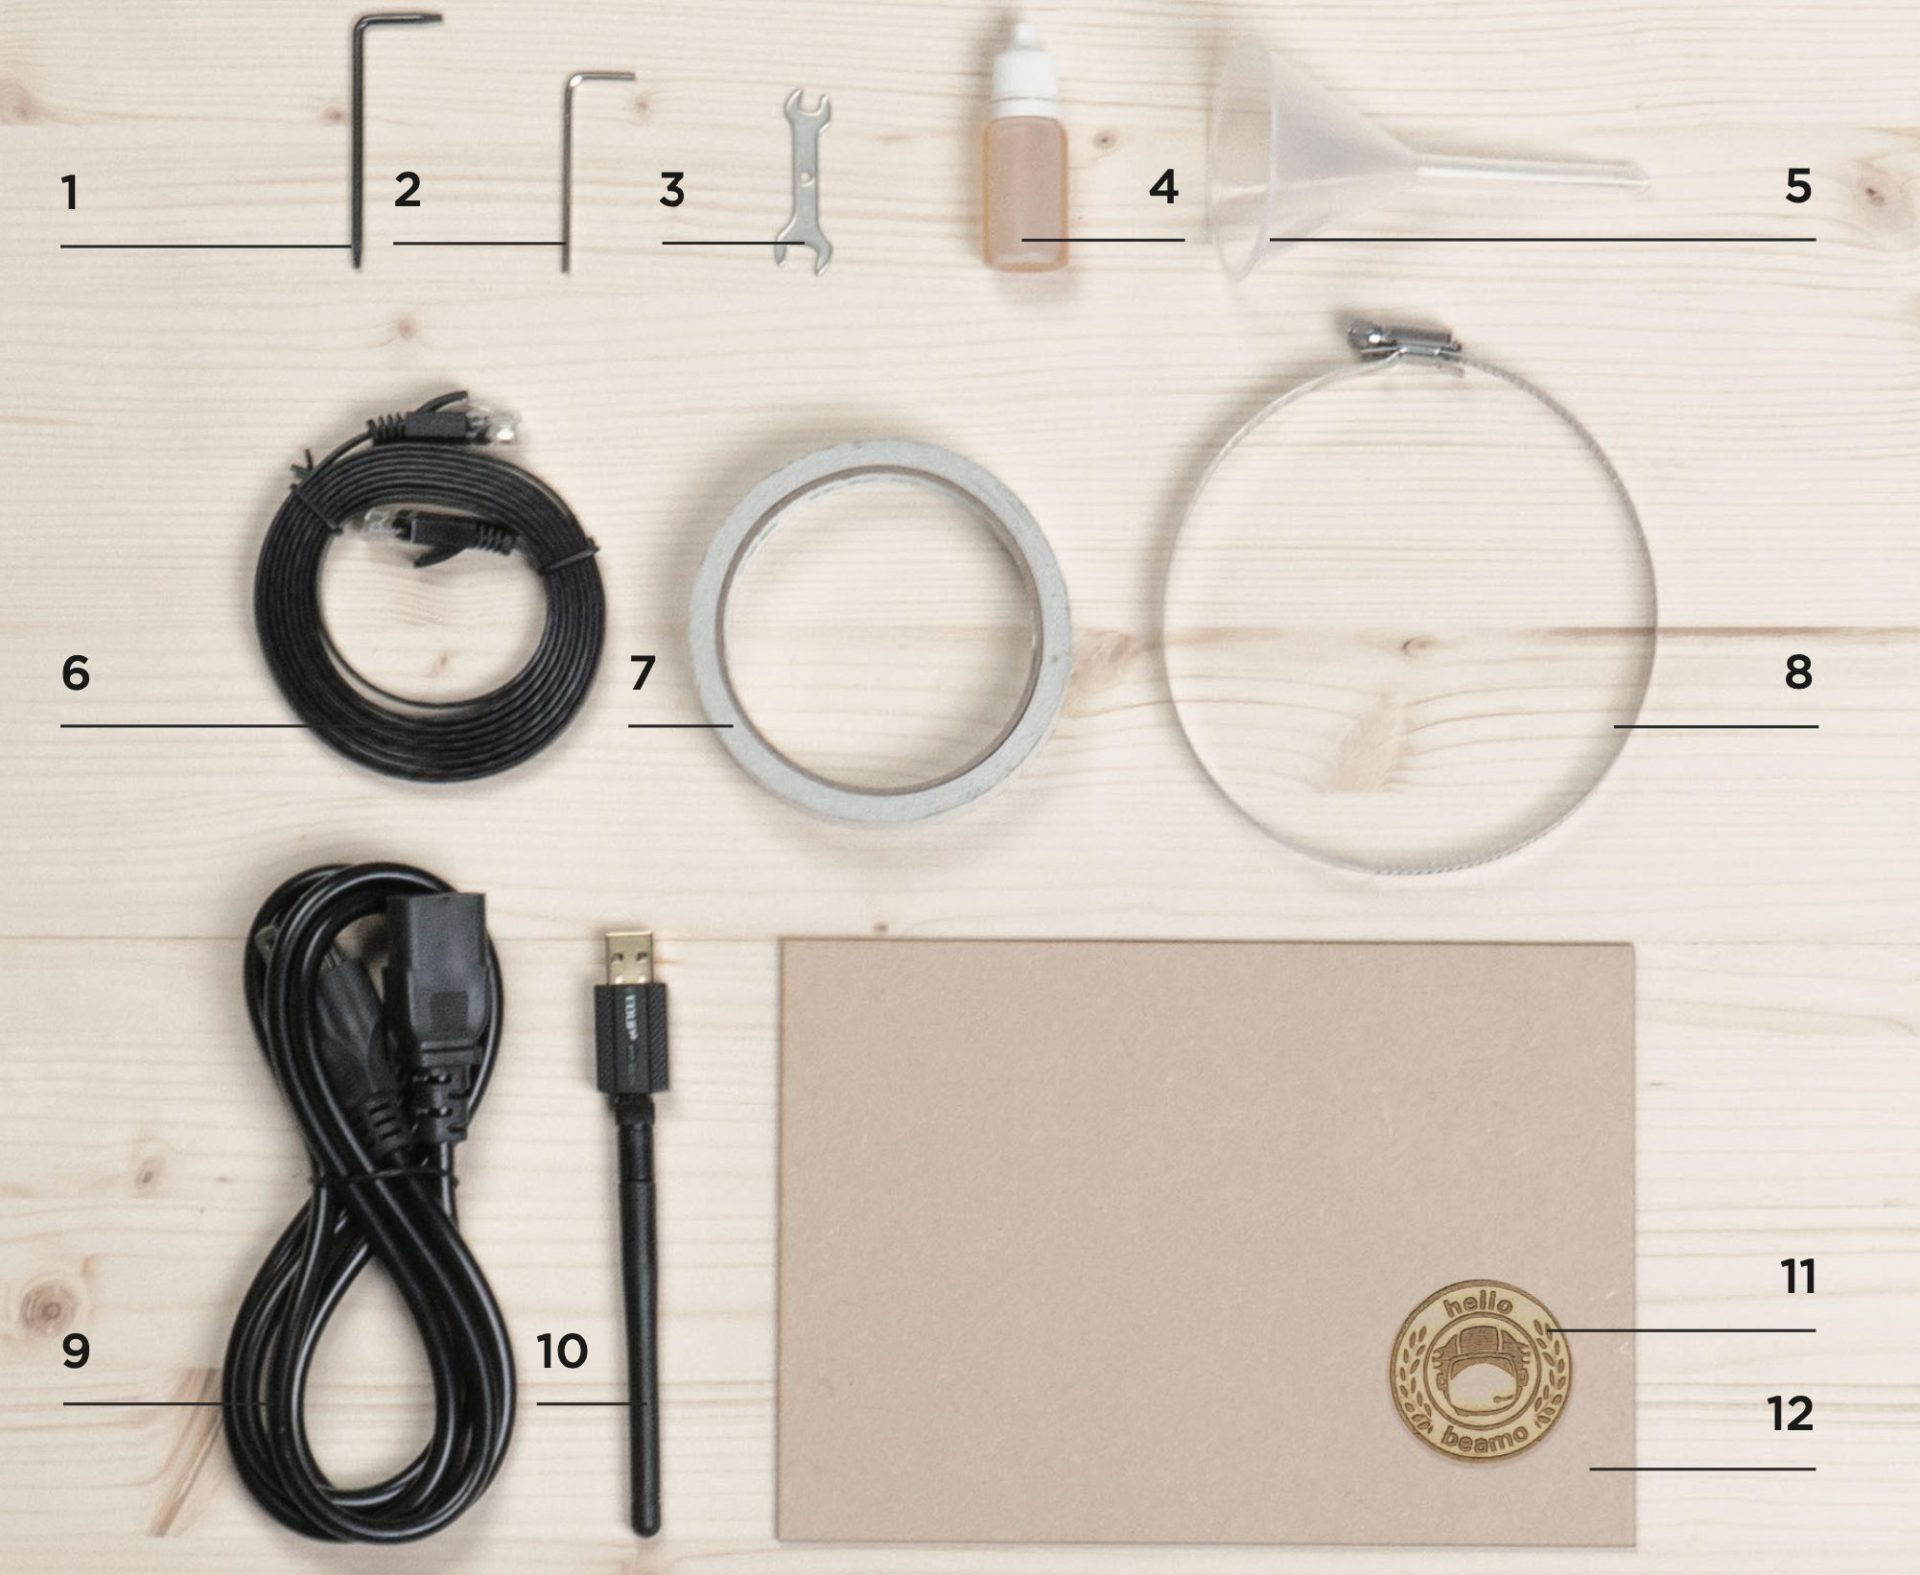
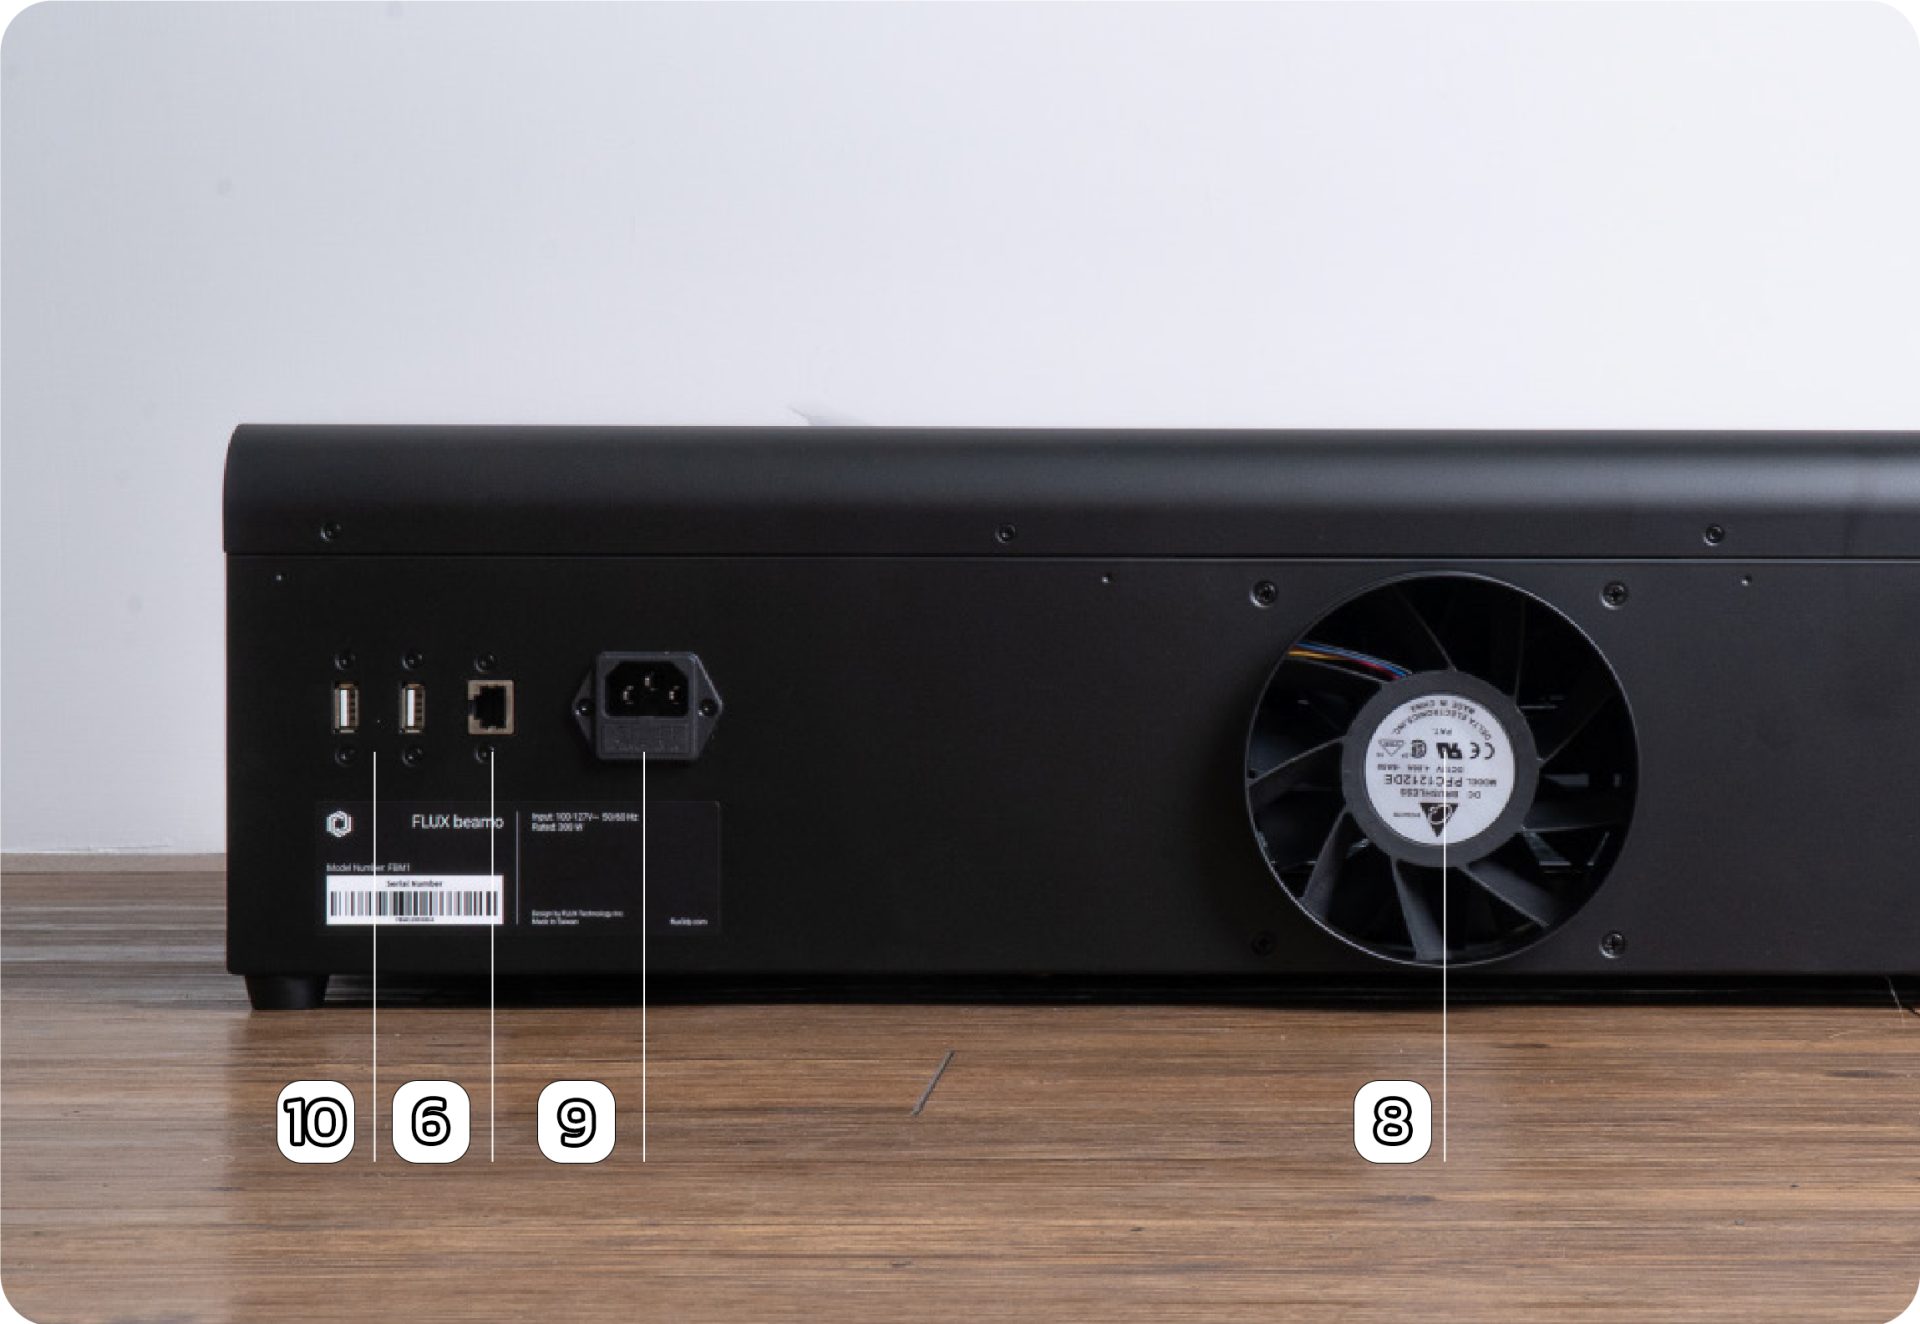
1. การติดตั้งอุปกรณ์ต่อพ่วงต่างๆ Assembly parts 1. | Torx screwdriver 2. | 2.5mm hexagonal wrench 3.| Double head wrench 4.| Lubricating oil 5.| Funnel 6.| Ethernet cable 7.| Double-sided tape 8.| Clamp 9.| Power cord 10.| Wi-Fi dongle 11.| Engraving sample 12.| Wood piece. 10. | USB port 6.|Ethernet port 9.| Power port 8.| Ventilation fan a. Install the Wi-Fi dongle: Apart from connecting through a router (Wi-Fi / LAN), you can also connect directly to your computer via an Ethernet cable. a. Install the Ethernet cable : e. Membership Login : a. Install the Ethernet cable : e. Set the IP address of your computer to 192.168.2.1 : f. Set the software interface display language : 3. การใช้งาน Software Beam Studio วิธีใช้งาน Beam Studio เริ่มต้น
วิธีกำหนดการทำงานแต่ละเลเยอร์
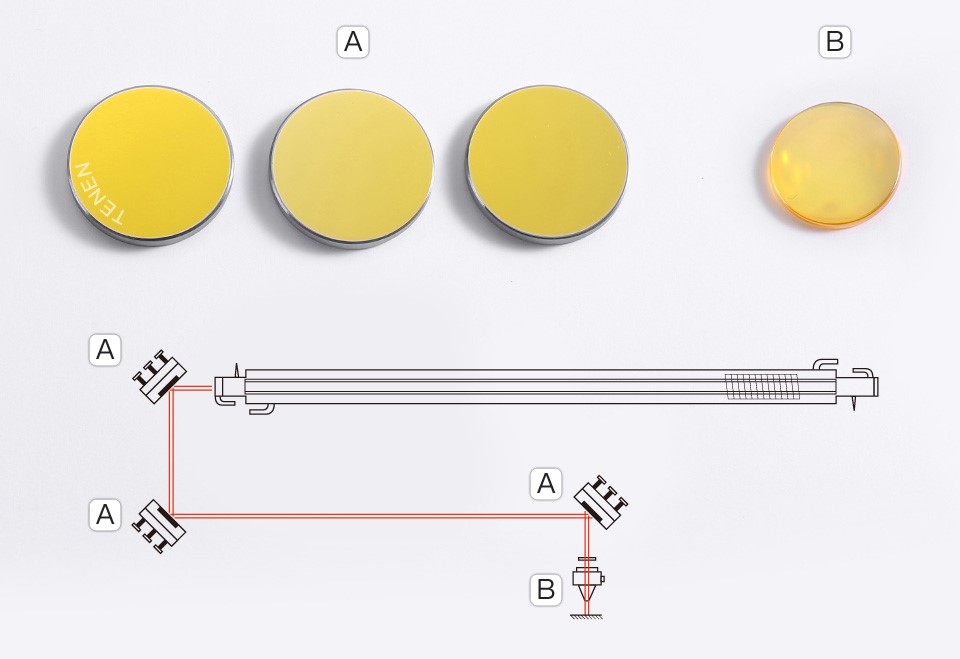
วิธีการจัดเรียงไฟล์บนโปรแกรม Beam Studio วิธีแกะสลักรูปภาพและการตั้งค่าเพิ่มเติม วิธีสร้างข้อความและการตั้งค่าเพิ่มเติม (สำคัญมาก บทความเพิ่มเติม ** ความแตกต่างระหว่าง Bitmap และ Vector Files **) 4. การ Calibration Camera วิธีติดตั้งเลนส์เลเซอร์ (Optical Path Alignment) การเติมน้ำหล่อเย็น การทำความสะอาดกระจกและเลนส์
2. การตั้งค่า Connection Settings
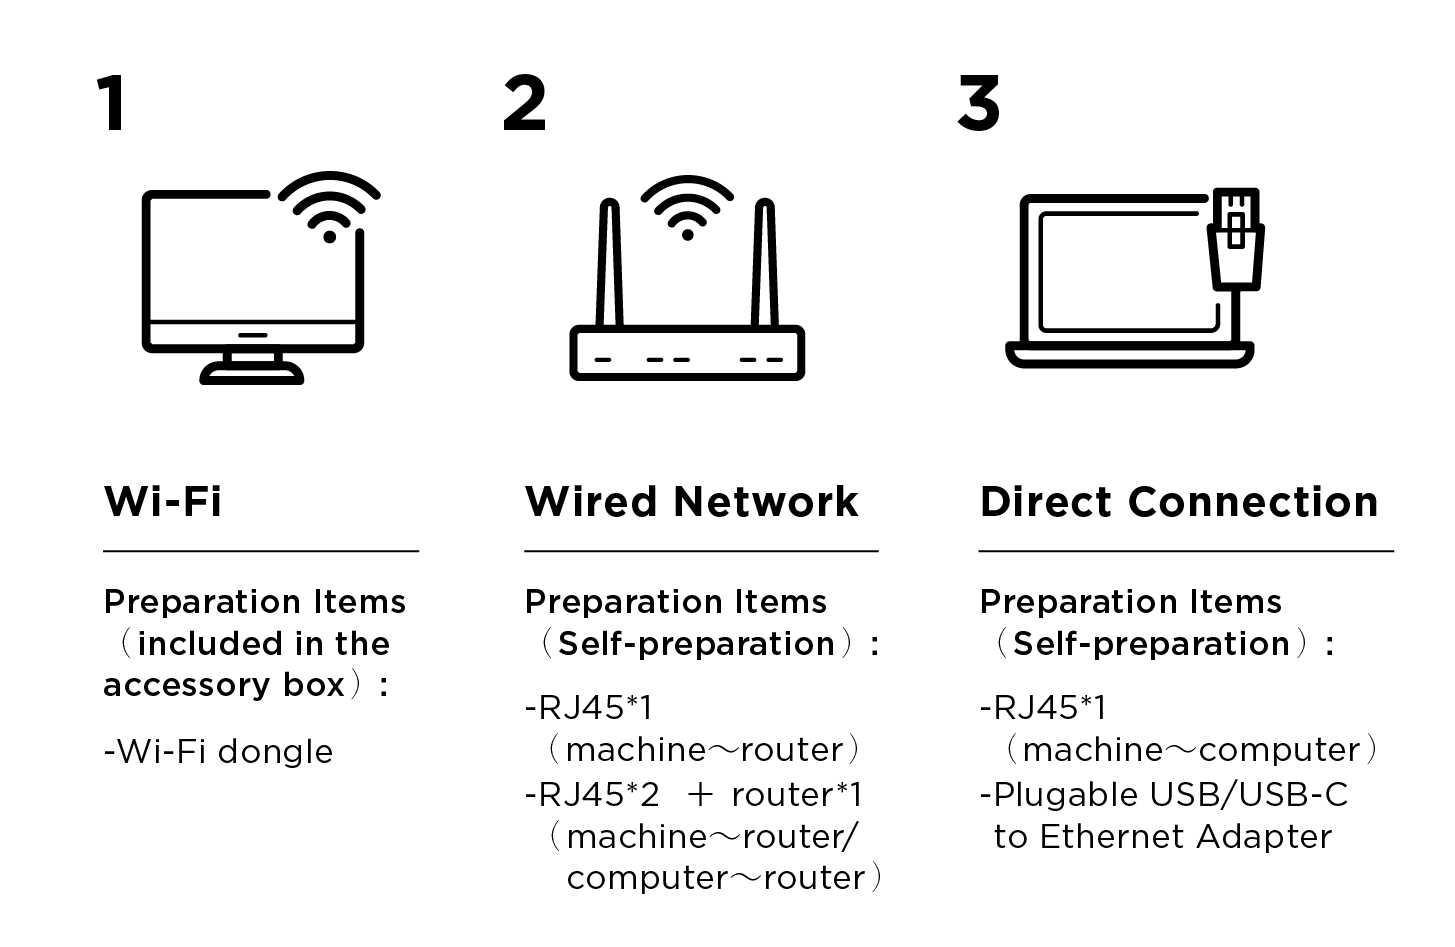

Remove the Wi-Fi dongle from the accessory box and install the dongle antenna at 90 degrees to any USB socket on the back of the machine for signal reception.
b. To set up the network of the machine [must use the same Wi-Fi (2.4GHz) as your computer network]:
“NETWORK” > “Connect to Wi-Fi” > Select the Wi-Fi you want to use > Enter the Wi-Fi password and press “Confirm” > “NETWORK” > Confirm the “Wireless IP” of the machine.
c. Set the software interface display language :
Use the drop-down list to select the language, and then click “Next”.
e. Select the connection method:
Select “Wi-Fi”.
f. Enter the IP address of the machine to complete the setting:
Check the “Wireless IP” address of the machine from the panel. Enter the wireless IP address of the machine into the computer to complete the setting.
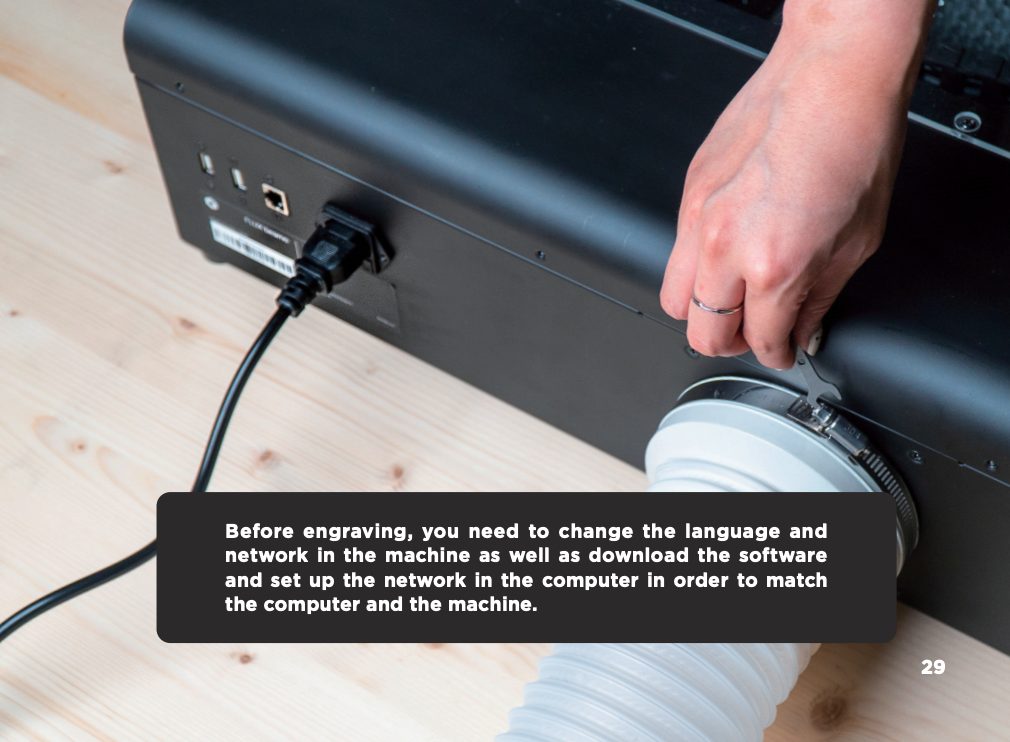
a. Install the Ethernet cable :
Install both ends of the Ethernet cable in the network slot on the back of the machine and slot on the router. The machine will automatically connect to the network in about 10 seconds after the installation is completed.
b. Confirm the machine network :
Confirm the value of Wired Network “MAC Address” of the machine in “NETWORK” page
c. Set the software interface display language :
Use the drop-down list to select the language, and then click “Next”.
e. Select the connection method :
Select “Wired Network”.
f. Enter the IP address of the machine to complete the setting :
Check the “Wired IP” address of the machine from the panel. Enter the wired IP address of the machine into the computer to complete the setting.
1. Windows : The method is applicable to Windows 10 system
Install both ends of the Ethernet cable in the network slot on the back of the machine and in the computer network slot.
b. Confirm the machine network :
Confirm the value of Wired Network “MAC Address” of the machine in “NETWORK” page
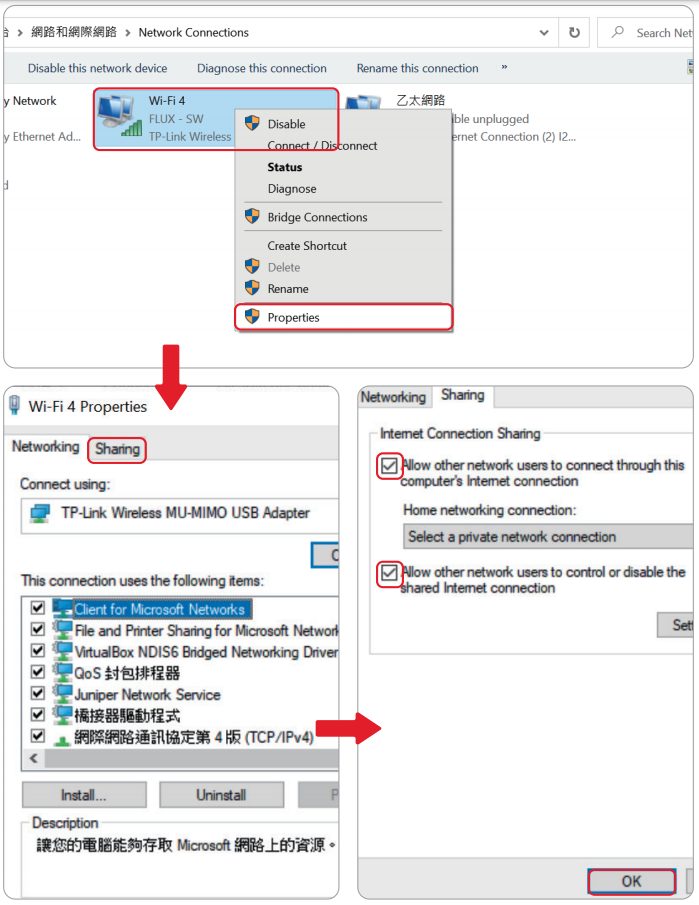
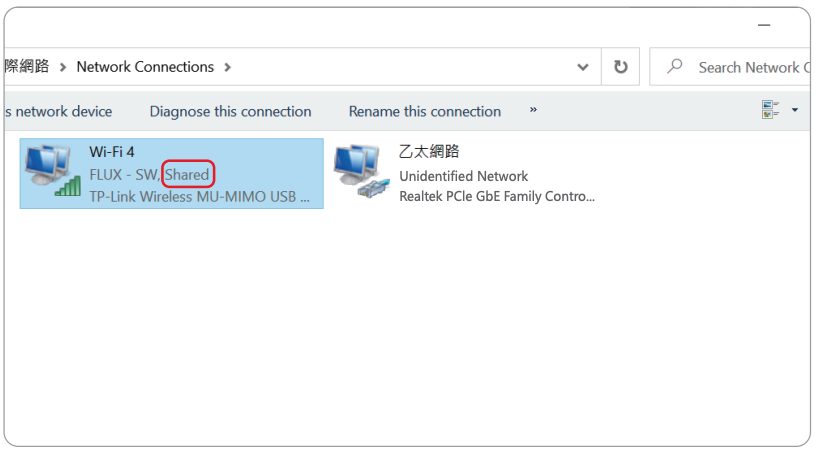
c. Enable Internet connection sharing :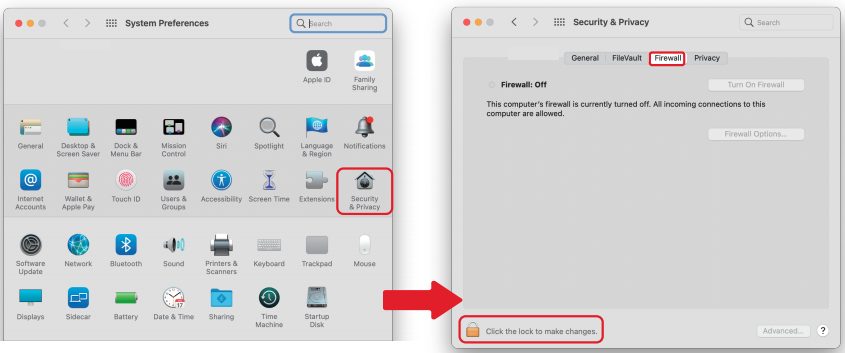
Login to the membership, you can access more functions added to the software from time to time in the future.
f. Select the connection method :
Select “Direct Connection”.
g. Enter the IP address of the machine to complete the setting :
Confirm the “Wired IP” address of the machine from the panel. Enter the wired IP address of the machine into the computer to complete the setting. It usually starts with 192.168.
(If it starts with 169.254, it means the computer may be set up incorrectly or the network cable).2. macOS: The method is applicable to macOS environment. If you are using macOS Catalina, please update to at least 10.15.4.
Install both ends of the Ethernet cable in the network slot on the back of the machine and in the computer network slot.
b. Verify the machine network :
Verify that the machine has a value for Wired Network “MAC Address” in “NETWORK” page.
c. Turn off the computer firewall:
“System Preferences” > “Security & Privacy” > “Firewall” > “Turn Off Firewall”.
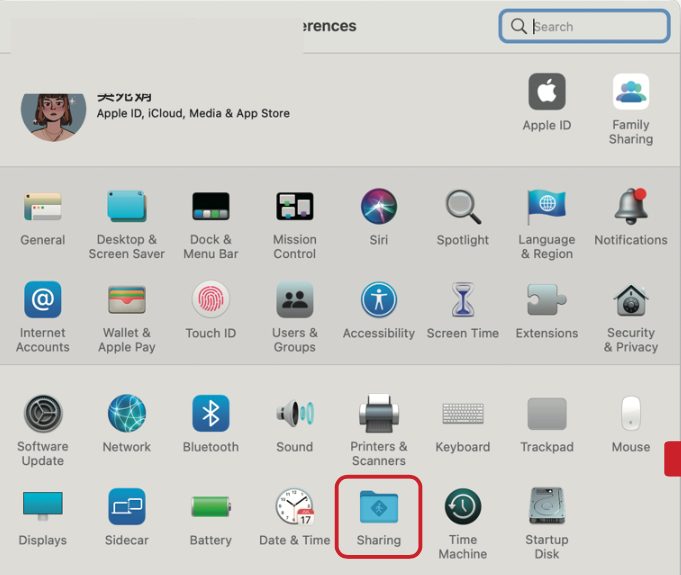
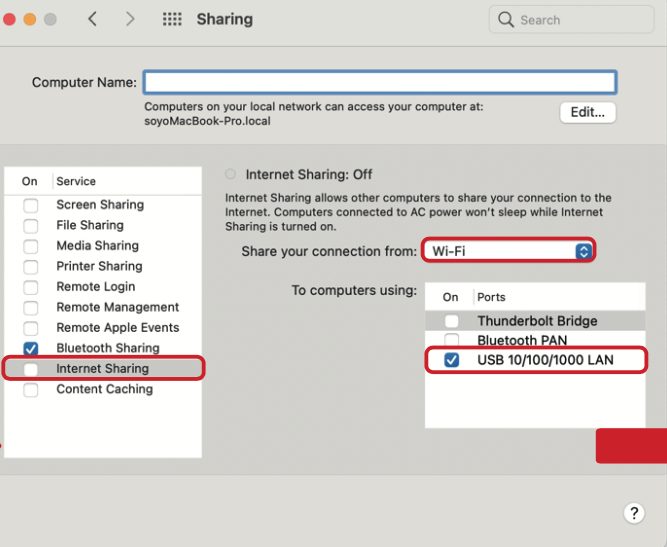
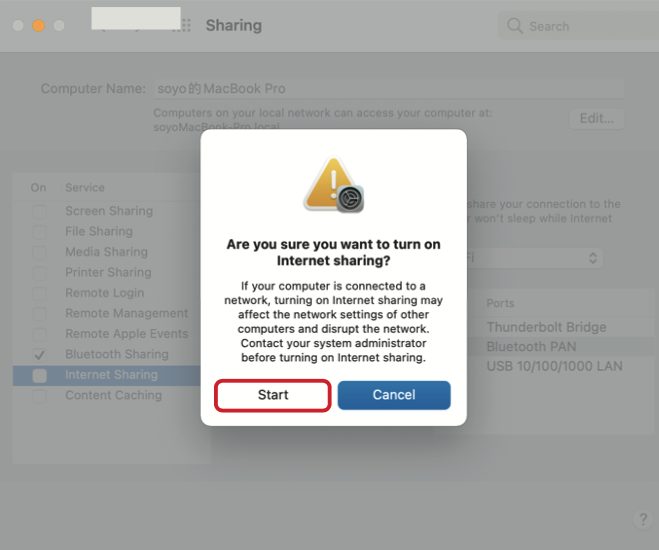
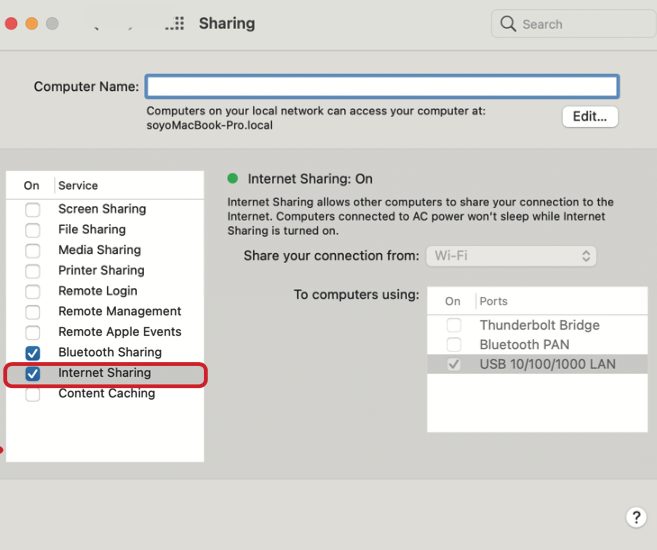
d. Enable Internet connection sharing :
“System Preferences” > “Sharing” > Set the “Share Your Connection From” to the network you are using (Wi-Fi or Ethernet) > Select the port to use > Click “Start” on the pop-up message to enable the sharing.
Click the network icon in the upper right corner, select “Open Network Preferences” > select the interface intended to use (RJ45 adapter) > Select “Configure IPv4” as “Using DHCP with manual address” > And set the “IPv4 address” to 192.168.2.1.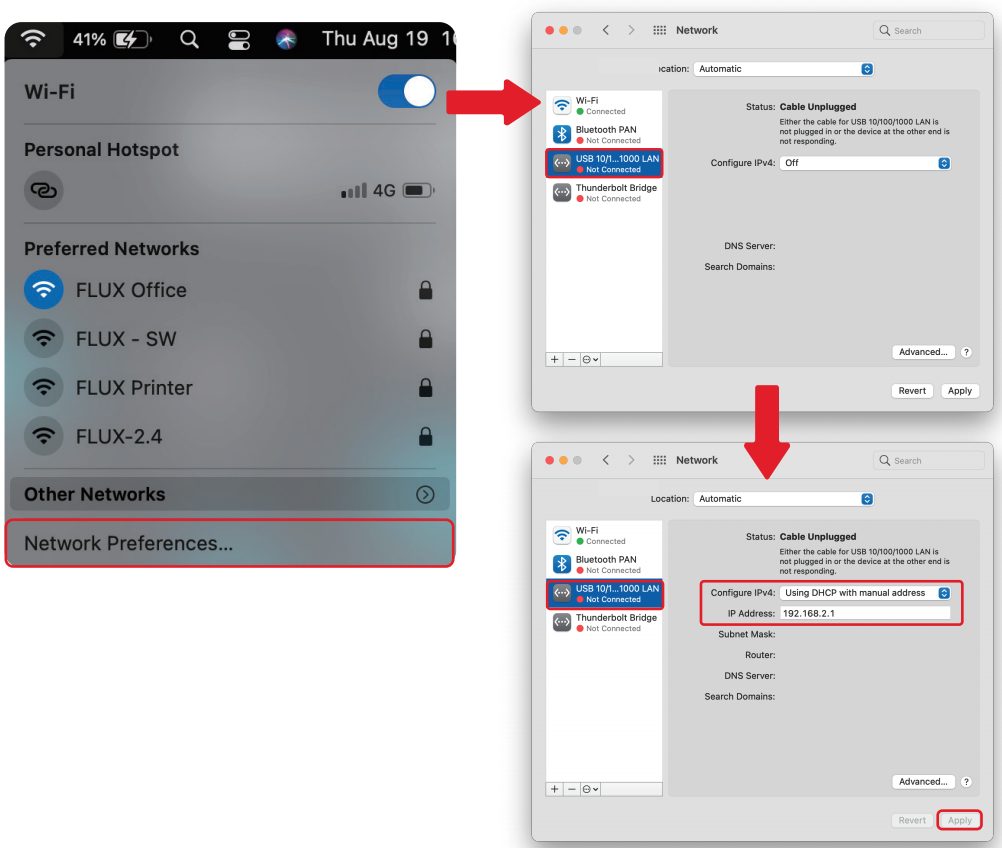
Use the drop-down list to select the language, and then click “Next”.
g. Membership Login :
Login to the membership, you can access more functions added to the software from time to time in the future.
h. Select the connection method :
Select “Direct Connection”.
i. Enter the IP address of the machine to complete the setting:
Confirm the “Wired IP” address of the machine from the panel. Enter the wired IP address of the machine into the computer to complete the setting. It usually starts with 192.168. (If it starts with 169.254, it means the computer may be set up incorrectly or the network cable needs to be plugged in again).
5. การ Simulate Engraving Beam Studio
6. การใช้งานเครื่องเลเซอร์เริ่มต้น (Basic Operation)
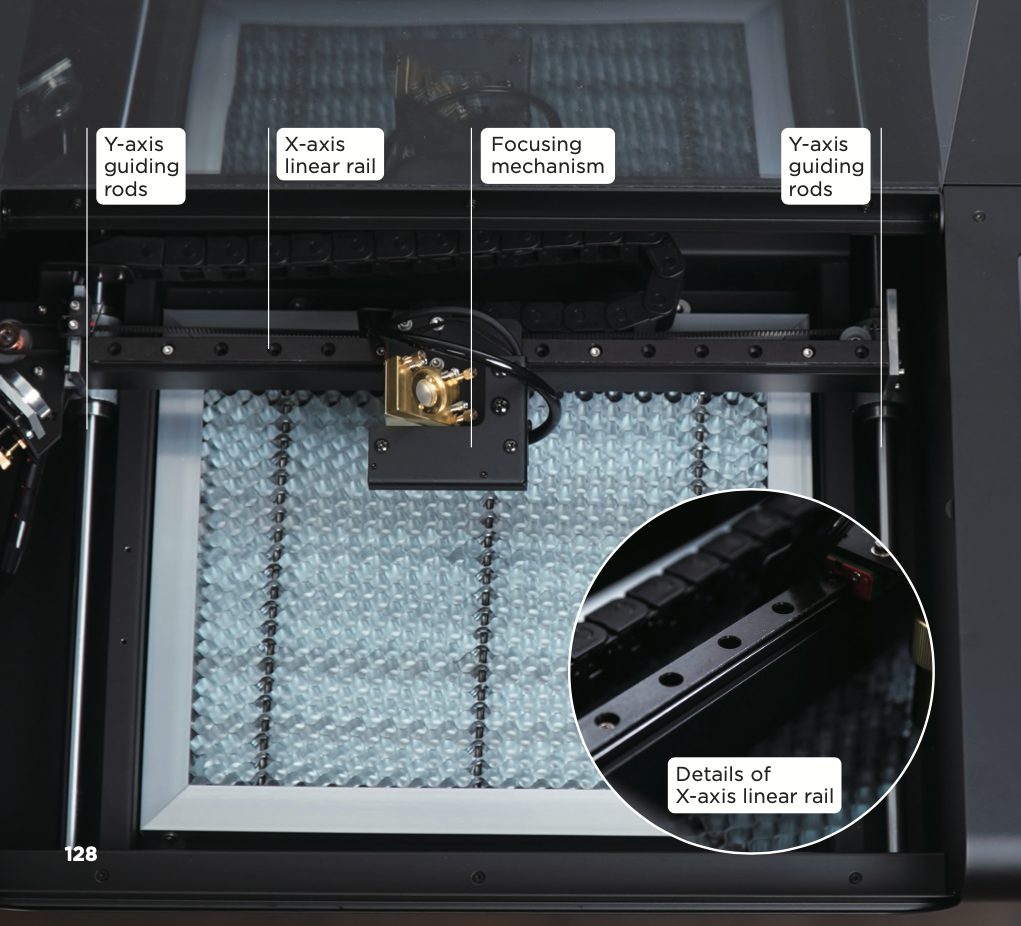
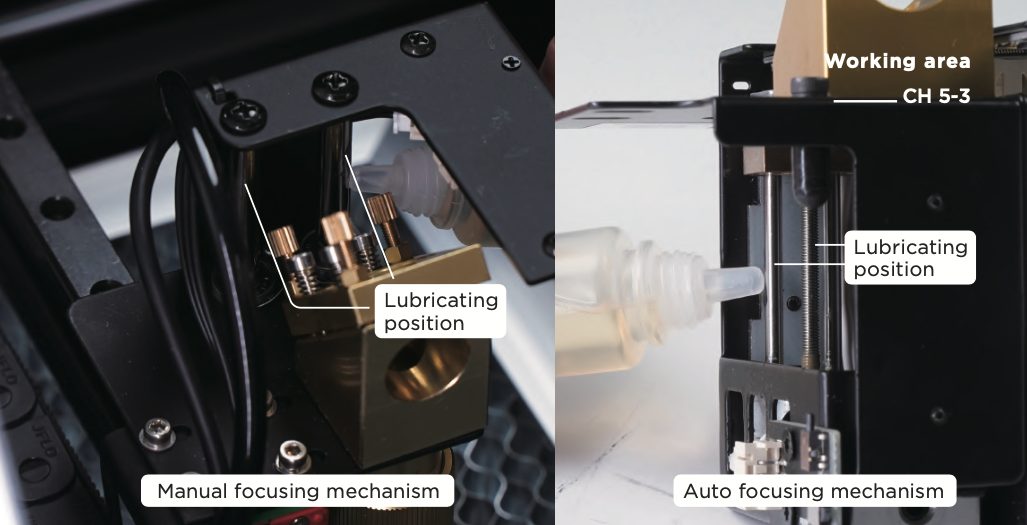
การบำรุงระบบหล่อลื่นตามแนวแกน